Home
Home PC Game Trailers
 News
News Menu
MenuFoxhole Gunboat Guide (Top 20 Tips)
Updated: 02 Jun 2023 1:55 am

Boats! Gun Boats! Boats with Guns!
 BY: Ryan W.
Ever wanted to sail the Caovish seas in your very own gunboat. Raiding enemy shorelines with devastating cannon fire? With the gunboat, you can do just that.
An ideal tool to support sea invasions and land offensives that come close to a shoreline. The gunboat is a great thing to have in either factions naval arsenal. A competent crew can really lay the hurt on with one. So here is all you need to know about them. What they do, how they work and how you can get your hands on one for you and your crewmates.
As well as the gunboats themselves, we'll cover how they can be used in landing operations, naval ops, and all the things you'll need to make you king of the seas, performing you very own D-Day landings.
20. The Ships

The Colonial Charon

The Warden Ronan
While they are aesthetically different, both standard gunships come equipped with the same armaments. The same light skinned armour and both cost exactly the same to produce.
Armed with an almost 360 degree turning front turret with twin 12.7mm machine guns on the front and a 120mm artillery gun on the rear, the gunboats are essentially small floating gun batteries.
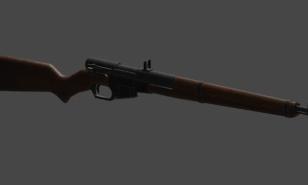
19. The 74c-2 Ronan Meteora

The Warden variant of the Ronan, The Meteora.
While the Colonials only get the standard gunboat, the Wardens have access to a slight variation on the standard gunboat design. Sacrificing the twin 12.7mm machine guns, the Meteora replaces them with a forward facing 120mm cannon.
This is double the fire power than that of a single gunboat but the drawback is that it now lacks any defensive capabilities. It’s wise to not have one of these operating alone where they are vulnerable to barge crews.
As the guns can move independently of one another, you have the added option of firing at two different targets. However, this is gonna take a good commander spotting and a competent crew as well.
18. Getting your hands on your own boat

A barge being built at a shipyard
To build your own gunboat, you’ll need to hammer it together at a shipyard. You can find these on your map with an anchor symbol but they are nearly always right next to seaports. Just look for the lone piers with a hut on them.
You’ll need 160 Rmats on you to make a gunboat. This includes the Warden variant, Meteora. When you have your Mats, approach the shipyard and press E. You’ll be presented with a menu of available ships to build. Select your gunboat and the blueprint will pop up next to the jetty.
Hammer away at it until all the Rmats have been put in and there you go. Your very own gunboat.
If you’re planning a naval operation however and would like your own fleet, you can produce gunboats by the crate at a Mass Production Factory. For 480 Rmats, you can have a crate of 3.
17. Your Scurvy Seadog Crew

Now, you’re gonna need to get yourself a seaworthy crew. The max crew that a gunboat can take is 4 but at a push you can get away with 3 if the commander also acts as the helmsman. That's nautical speak for the driver.
Ideally though you want to have a dedicated dude at the helm. A gunner on the 120mm gun. The commander who can “turn out” of the hatch and scope out the coast lines with binoculars. And finally, a gunner on the forward 12.7 machine guns looking far out ahead for any threats from the sea.
Make sure your commander has binoculars in their inventory. Otherwise, they’re no use and will have to walk the plank.
16. Release the Kraken
Attacking with a gunboat is essentially attacking with a 120mm artillery gun but with the added bonus of being able to come from the sea. Although you only have a range of 50 - 100m, if the environment allows, you can get that gun pretty damn close.
You may even be able to support a land push somewhere like the Godscrofts. Scattered islands with lots of routes to sail through undetected. Once you’re in position, it's only a matter of the commander spotting from the top while the 120mm gunner fires.
The 120mm gun itself works the same as any other "on land" artillery gun. Except it's on the water. Aim by holding the right mouse button and scroll the mouse wheel to adjust the range.
You will need to adjust for wind which, as you won't be able to see any indicators on the ocean, will be up to the commander to communicate the fall of the gunner's rounds. To adjust accordingly.
If you want to know more about how artillery works in general to give you a better understanding, here is a handy guide with all things arty. Other than that, the small range 120mm gun is pretty straightforward.
Unless you’re in the Meteora which has 30 inventory slots, you’ll only have a max of 20 so make those rounds count. You’ll want to be doing hit and run tactics as it won’t take long before the enemy clocks on to what you’re doing and sends a barge crew after you.
Regardless, one competent gunboat crew can do a hell of a lot of damage.
15. Bad Barge Men

The humble barge. Available to both factions
Don’t let its humble look fool you. This thing can be devastating to a gunboat crew if it needs to be. Its empty deck can have up to 6 soldiers on it. If all of them happen to be armed with sticky bombs, then that's a bad day for your gunboat crew.
As soon as you start firing that 120mm gun, your machine gunner should be looking in all directions for a barge full of soldiers. Any enemy worth their salt should know exactly what you’re up to and will be scrambling to get a barge out there to hunt you down.
The barge isn’t invulnerable. It’s slow and can be disabled with enough 12.7mm. Make sure your gunner hasn’t got bored and gone AFK.
14. Naval Operations

This writer taking part in an impromptu naval operation
Gunboats form an integral part of any Foxhole Naval operation. Even just one can make all the difference. While the main fleet will mainly consist of a Landing ship, a freighter or two and a tonne of barges, a gunboat will be essential for one main reason.
While the barges can bring artillery guns on their decks to be deployed in the initial landing, they will take time to deploy and field. Especially during the chaos of a seaborne landing.
The gunboat is a seaworthy artillery piece that is ready to go as soon as the invasion fleet arrives.
13. Scouting
One gunboat scouting out an enemy coastline and probing defences won’t cause too much of a stir. Although it will definitely arouse suspicion if you are planning to land deep behind enemy lines.
You don’t even have to get in range if the commander can get some eyes on the landing zone while the invasion force waits out in the safety of the open ocean.
You may even be able to cause a diversionary strike before the main force lands. Emptying your ship's magazine and sailing away before they even realise what’s about to hit them.
12. Gunboat V Gunboat

A gunboat battle on the ocean
In a pitched battle, gunboats are evenly matched. The Colonials in this video had the advantage of outnumbering the Warden boat, even though the Wardens had the advantage of getting the first shots off.
As you can see, they aren’t the most robust of vehicles in the game so crew them with care. 12.7mm can disable them. Look after your ships and they’ll look after you.
11. Fire the Cannon!
As you probably gathered from the video, you can indeed turn your 120mm gun into a cannon that is capable of destroying another gunboat. If you’re in the Meteora, you’ll have a forward facing gun as well.
Still, it will require careful coordination with your crew. Specifically the helmsman. Make sure they know what they’re doing and haven’t drunk too much rum.
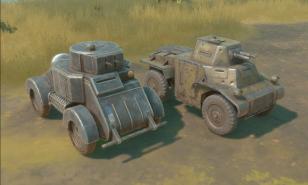
10. The Landing APC

The Warden Maloy (left) and the Colonial Acheron (right)
There is one more major threat to you and your crew while you’re out on the ocean and that is the amphibious landing APC. It can carry 6 people in the back, armed with stickies and other nasties to sink your ship.
They can travel both land and sea and are faster than your gunboat in the water so be careful and be on your guard. If you’re a Warden, the Colonials have a variant that comes with a 12.7mm machine gun that can really ruin your day as well. Be on your guard for these predators of land and sea.
So I've got the gunboat. How do these naval ops work?
Well, landing ops are pretty hit and miss. Mostly miss. This isn't due to skill issues, although it can be if people really mess up. It's mainly due to the logistics of staging an amphibious invasion.
In reality, historic amphibious landings are a hell of a thing. A huge gamble by military planners and while the famous successful allied invasion of Normandy comes to mind, there were plenty throughout history that weren't. See Dunkirk.
Either way, they are a hell of a lot of fun but need a lot to pull off. So here's the ins and outs of them so you can see where you can find your role.
9. Lots and lots of stuff
You are going to need a huge surplus of stuff if you want to give your landing op the best chance possible. You are going to be cut off from logi for a long time. The more you bring with you, the longer you can sustain your invasion.
And when I say stuff, I mean literally everything. Everything that you see at a normal frontline bunker base is what you're going to need in your White Whale landing ship. Shirts, guns, ammo, explosives, medical supplies, uniforms, static weapons and tripods and an absolute shit tonne of Bmats.
You need to support an entire front from one landing ship because as soon as it lands, it will be advertised to the entire team as a viable spawn point. Randoms will pop in from all over your faction and they need to be supplied until a foothold is gained. So bring more than you think you need. Just in case.
To get all this ready, it will take you some time. This is where having a private stockpile at a seaport comes in handy. You can cook up all your supplies and have them ready to go on the day of your invasion.
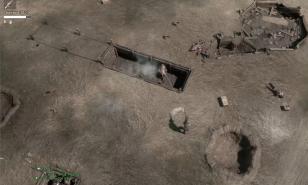
8. The White Whale

The BMS White Whale deployed on a beach
The main event of the landing op. So to speak. This ship can be loaded with everything that soldiers spawning in will need. Think of it like a mobile base because that is essentially what it is. As soon as those doors drop, it becomes a team wide spawn point.
You can hammer one of these together at a shipyard for 100 Rmats or get a crate of 3 for 300. Once you have it, you'll need to load it. Unfortunately, an undeployed landing ship cannot be interacted with by vehicles. Loading has to be done by hand or by sailing it over to the seaport and pulling directly from it.
Once you have arrived at your landing site, press the F key to deploy the landing ship. It'll take about 10 seconds to deploy but once it’s done, your entire faction will be able to see it and use it as a spawn point. Your invasion will be underway.
7. The Freight

A freighter with its battle ready cargo
Of course, while you will need your spawn point to make anything happen, you’re also gonna need to bring plenty of other things. Armour, pallets of ammo, etc. Isn’t it great that freighters are a thing?
With five spaces in its cargo hold to hold anything packageable, you can bring five tanks with you in one of them. More than enough for a decent invasion force. Or, you can bring a tonne of ammunition for your artillery guns that you want to bring. Keep your gunboats stocked up with ammo as they protect your landing ship. The possibilities are endless and completely up to you and the crew you bring with you.
Using them couldn’t be simpler. Once you are at the helm, press the F key to open up the cargo doors. From there, provided you are at a seaport, you can use the crane to pick up and drop up to 5 packageable items into its cargo hold. Press F again to close the doors when you’re done.
It's important to remember that you don’t have any means to defend yourself so stick close to the gunboats or the barges with armed soldiers on board. You don’t want your cargo to see action in Atlantis.
Don’t forget as well that you won’t have a convenient seaport crane when you land so make sure you bring one with you. It can’t be in your cargo hold. It’ll have to be on a barge, ready to go the moment it lands to unload all those sweet tanks you’ve brought.
A freighter will cost you 500 Bmats to hammer together at a seaport or 1,500 Bmats at a mass production factory for a crate of 3.
6. Barge Marge!

Just look at all those barges. And this is only the ones that fit on screen
This is gonna be the name of the game when it comes to seaborne landings. Barges can hold everything on them. As you can probably see from the picture above.
In this example, I was captain of The Barge Marge. Carrying the crane for the op. Vital for unloading the freighter at the other end and getting all of our gear onto the beach.
The bulk of your invasion force is going to be made of these workhorse ships. They will carry absolutely everything including the personnel that you’ll need for the initial invasion force. While most of your fighting infantry will spawn in as soon as they realise that a landing ship has touched down, they’re going to be random people who probably aren’t gonna be clued in to the plan. Neither will they have taken part in any prep work.
So it’s up to all those that you’ve gathered in the staging phases who are going to spearhead your landing. Once you drop those barge ramps, they've gotta hit the beach running.
A barge is pretty cheap and easy to use. Press F to raise or lower the ramp. You won’t be able to move when the ramps are down. Neither can you move if you have more than 6 people on board. You’ve also got inventory space so make sure your barges are making the most of their cargo holds to bring more stuff.
At 150 Bmats a piece of 450 for a crate of 3, go ahead and make as many as you want. If your invasion force keeps growing, hell, feel free to make more.
5. A Holding Area
So you have everything you need. Your fleet is loaded up and ready to go. You have your mission. Your target. Your landing zone. But how are you gonna all hit the beach at the right moment?
The more ships you have, the more stuff on board and the more people who show up to take part in your landing op, the more complicated it’s going to be. You’re gonna have to try and keep everyone organised and on point.
None of that is mentioning actually getting to where you need to go. Naturally, you’re probably in a nice, safe, backline port a good few hexes away where you can take all the time in the world to get your fleet ready. But you’re gonna have to cross those hexes somehow which can be a huge pain in the butt. Especially if you have to travel through some hexes that have queues to get in them.
The best way to get around this is to have at least a gunboat or two to scout ahead for a safe spot. Way off from a coastline and out of range of any intel gathering structures. You don’t necessarily need to scout it but it definitely won’t hurt. Either way, as long as you can have an agreed upon spot in the hex where your invasion is taking place. That way, your fleet can gather before you greenlight the invasion. You will all be in the hex when it kicks off and no one will be waiting at border queues.
4. Intel and Comms
When you do land, the entire team will be able to see it. The enemy will probably notice very quickly as well but hey ho, you’re already there by that point.
What you don’t want to do is give the game away too early. Remember, loose lips sink ships. To that end, you’ll want to keep any intel that you have about your landing op quite close to your chest. If you are going to invite random people to join you, make sure you make a squad.
The good thing about all being in a squad is that it aids communication. You can use your own squad chat channel and you can even use your own squad specific map posts that only people in the squad can see.
To make a squad, you can do it from the tab above the chat box. Along the top will be the option to make your own squad.
It helps because you can place your map markers for your invasion forming up points in the ocean for everyone to gather at. It really does come in handy for organising a very quick fire landing op.
3. Hitting the beach

The very first thing that you need to do, above all else, is run straight to the landing ship when it's deployed. Interact with it by pressing the E key and set your spawn to it by pressing the home button on the actions tab underneath its stockpile.
If you don’t do this and you run straight out towards the enemy and die, guess where you’re gonna spawn. It’ll be a good handful of hexes away and you’ll have to redeploy to the landing ship. So make sure that you do it.
2. Jobs need doing

An invasion is a hell of thing
Now the initial reaction for a lot of people, myself included, is to set spawn and run straight into the fight. Don’t get me wrong, it is vital to establish lines and stop the enemy from overwhelming the invasion force before it can even get a foothold.
But if everyone is out fighting the good fight, there isn’t anyone to do the stuff that needs to get done to establish a beachhead. Hopefully, your landing will have caught the enemy off guard. This will give you plenty of time to get things unloaded and set up.
Think of an amphibious invasion as a front line Border Base on speed, things need building up and they need building up rapidly. Getting a forward bunker set up should be a priority, that way, Logi trucks can start bringing supply further inland.
Freighters will need to unload their cargo. Armoured vehicles will need to get fueled, armed and fielded as soon as possible. Artillery guns need to be set up to support infantry. Basically, there is a shit tonne that needs to get done. You’re trying to build a base as quickly as possible while racing against the enemy's quick reaction force.
Thankfully, it won’t take long before randoms spawn in at the landing craft which will take a lot of the infantry pressure off you and your fleet so you can focus more on making your little visit to enemy shores more permanent.
1. Save what you can if you have to.
There is no shame in retreat. Nearly all landings end in failure and you probably put a lot of time and effort in building up the stockpiles necessary to pull on off.
The great thing about the landing ship is that you can get back in it. Close it up with the F key and bug out just as fast you landed. It’s much better to cut your losses and get away with the stuff you still have in your landing ship instead of losing it all before most of the kit got a chance to fire a shot in anger.
Don’t be too disheartened if it doesn’t work out. It’s a gamble but an extremely fun one to even get to take part in one of these naval ops. So get out there and enjoy it ya sea rats!
Conclusion
While a very fun part of the game, there is still a lot to be desired from gunboats and naval warfare in general. It is to be expected as most of the fighting happens on land but there are a lot of people out there with their fingers crossed for some more in depth naval updates coming down the pipe.
Nevertheless, naval operations and getting to take part in your very own D-Day is some of the most fun you will ever get to have in Foxhole. Trust me. Even if it doesn’t work out for you in the end.
You might also be interested in;
Share this Article:

- Log in or register to post comments