 Home
Home PC Game Trailers
 News
News Menu
Menu[Top 10] Guild Wars 2 Best PvE Support Builds
Updated: 01 Feb 2024 5:06 am

Playing support is more than just providing healing. It is ensuring that the team is operating at peak efficiency to take down difficult challenges with great ease.
 BY: Don Robinson Tan
In the realm of Guild Wars 2’s PvE scene, it can be said that you can use any build you want and you will be able to do any activity your heart desires at your own pace. You can wield a pure DPS build to mow down enemies left and right, a makeshift experimental build that may prove viable in the future, or anything in between. For those who want to be team players but don’t necessarily want to be a full-time medic, support builds become their bread and butter.
10. Power Alacrity Bladesworn
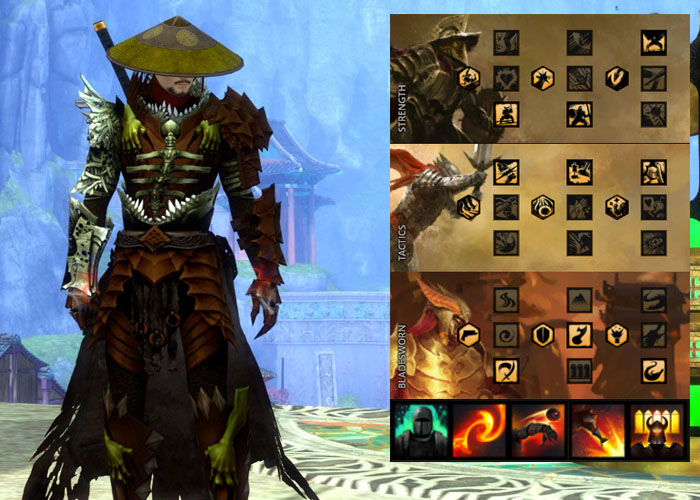
Whenever you see the Warrior profession or any of its elite specializations, normally you would think they are the “slash now, ask questions later” type and don’t have much options to play a support role. Oh how wrong you would be as they have a surprising amount of supportive abilities at their disposal that not everyone expects to use. The Power Alacrity Bladesworn is their answer for a team player that is willing to share the spotlight with other support units in the game.
Why Power Alacrity Bladesworn is great
- As the name suggests, the Power Alacrity Bladesworn has access to near permanent Alacrity buffs with Might along the side.
- Despite playing a more support-role, it still showcases its high-burst damage potential since it is still a Bladesworn.
Choose this build if:
- Your team is lacking in support skills or if Alacrity is still needed but no one can provide it.
- Your team isn’t doing great in dealing damage but you are ready to provide some additional Might buffs and your own high damage.
- You know how to time your Dragon Slash attack and can position yourself well to get a good hit in.
Full Build Details:
Major Perks and Traits
- Strength - Peak Performance, Great Fortitude, Berserker’s Power
- Tactics - Leg Specialist, Warrior’s Cunning, Martial Cadence
- Bladesworn - Unseen Sword, Fierce as Fire, Daring Dragon
Equipment
- Armor - Berserker’s stats (power, precision, ferocity)
- Infusion - Mighty WvW Infusion (increases power)
- Runes - Rune of Infiltration (increases power and precision)
- Relics - Relic of Peitha (after using any teleport skill, launch a blade that inflicts Torment debuffs while increasing outgoing strike damage towards the enemy inflicted)
- Trinkets - Berserker’s trinkets
- Weapon set - Assassin stat (precision, power, ferocity) main sword and Berserker stat off hand pistol with Sigils of Force (increases outgoing damage) and Accuracy (increases critical hit chance)
Consumables
- Food - Cilantro Lime Sous-Vide Steak (grants a chance to steal health on a critical hit, increases power and ferocity, Karma and all experience gained, and magic and gold find)
- Utility - Furious Sharpening Stone (increases both power and ferocity based on your precision)
Utility Skills
- Heal skill - Mending - A core Warrior healing Physical skill that grants healing for the user and fills their Adrenaline while also granting Endurance for nearby allies.
- Skill 1 - Flow Stabilizer - A Bladesworn Armament skill that increases the user’s Flow Rate and grants Fury buffs plus additional Flow if used when they still have Fury.
- Skill 2 - Overcharged Cartridges - A Bladesworn Armament skill that increases the explosion damage of your next attacks and when used again while still having stacks of it, will detonate the charges.
- Skill 3 - Dragonspike Mine - A Bladesworn Armament skill that drops a mine that inflicts Cripple debuffs while making the user evade backward to refresh your Dragon Trigger and acts as a Stun Break.
- Elite Skill - Tactical Reload - The Bladesworn elite Armament skill that refreshes all of the user’s ammo on Bladesworn skills and increases the charges for your Dragon Trigger.
For more build details, check this link: Hardstuck.gg
9. Arcane Staff Heal Tempest
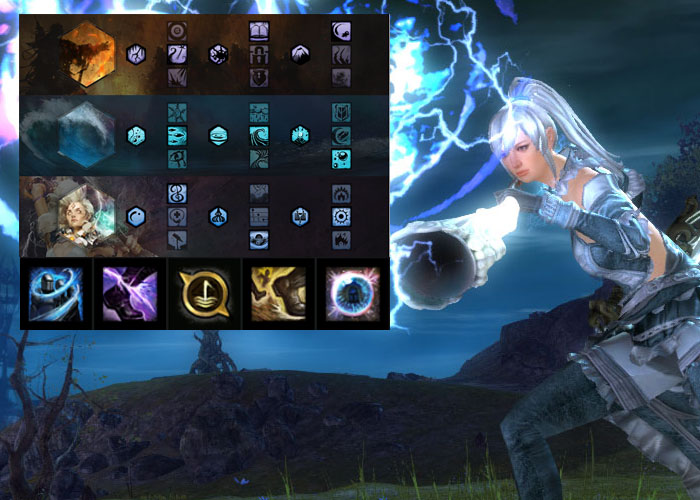
Elementalists have always played multiple roles in the realm of PvE and exceeded in doing so each and every time. From DPS to support, they have all the proper tools for whatever role they choose to become. The same can be said for its elite specializations and the Tempest is one of its better users of support skills.
Why Arcane Staff Heal Tempest is great
- The Elementalist’s staff is their go-to weapon of choice if they want an area-of-effect-centric playstyle as they have many AoE skills that can provide tons of DPS and support at a moment’s notice.
- The buffs it can provide allows it to be more of a defensive supporter, capable of aiding a healer or to become the team's only healer when needed.
- When the team calls for it, the Arcane Staff Heal Tempest can also act as the group’s kiter depending on the current encounter.
Choose this build if:
- You are used to playing as a healer looking to become a more flexible supporter for the group.
- You don’t mind engaging the enemy from afar when it is needed by the group.
- You can rescue your teammates from even the most lethal of attacks thanks to your perfect timing of your “Rebound!” skill.
Full Build Details:
Major Perks and Traits
- Arcane - Renewing Stamina, Arcane Resurrection, Evasive Arcana
- Water - Piercing Shards, Cleansing Wave, Soothing Power
- Tempest - Gale Song, Invigorating Torrents, Lucid Singularity
Equipment
- Armor - Minstrel stats (toughness, healing, vitality, concentration)
- Infusion - Healing Agony Infusion (increases healing and agony resistance)
- Runes - Rune of Water (increases healing and boon duration)
- Relics - Relic of Karakosa (heal allies whenever you successfully use a Blast combo finisher)
- Trinkets - Minstrel trinkets
- Weapon set - Minstrel stat two handed staff with Sigils of Concentration (increases boon duration) and Transference (increases outgoing healing)
Consumables
- Food - Delicious Rice Ball (increases healing, outgoing healing, and magic find during the Lunar New Year Festival)
- Utility - Bountiful Maintenance Oil (increases outgoing healing based on both your healing power and concentration, and experience gained from kills)
Utility Skills
- Heal skill - “Wash the Pain Away!” - A Tempest healing Shout skill that provides healing pulses for you and your allies that also cleanses a condition on the final pulse.
- Skill 1 - “Eye of the Storm!” - A Tempest Shout skill that grants the user and its allies Swiftness buffs and acts as a stun break.
- Skill 2 - Glyph of Renewal - A core Elementalist Glyph skill that revives a downed player while granting buffs based on your current elemental attunement.
- Skill 3 - “Aftershock!” - A Tempest Shout skill that grants the user and its allies with a Magnetic Aura that reflects enemy projectiles while also inflicting both Crippled and Immobilized debuffs and acts as a Blast combo finisher.
- Elite Skill - “ Rebound!” - The Tempest elite Shout skill that protects you and your allies from a fatal attack and instead grants healing, as well as provides an Aura based on your current elemental attunement.
For more build details, check this link: GuildJen.com
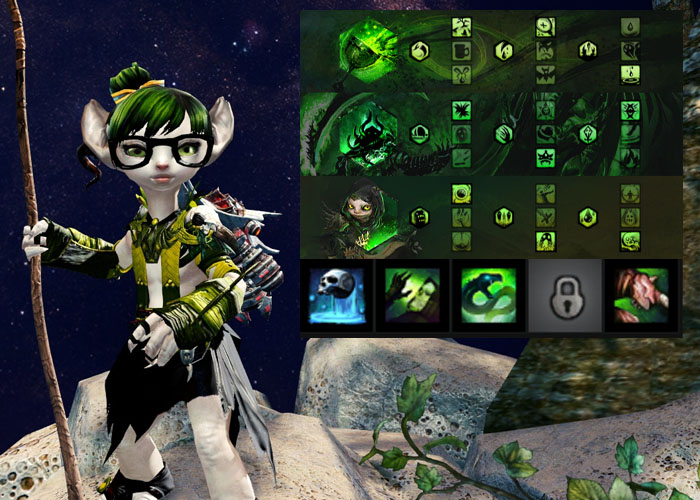
8. Condition Quickness Harbinger
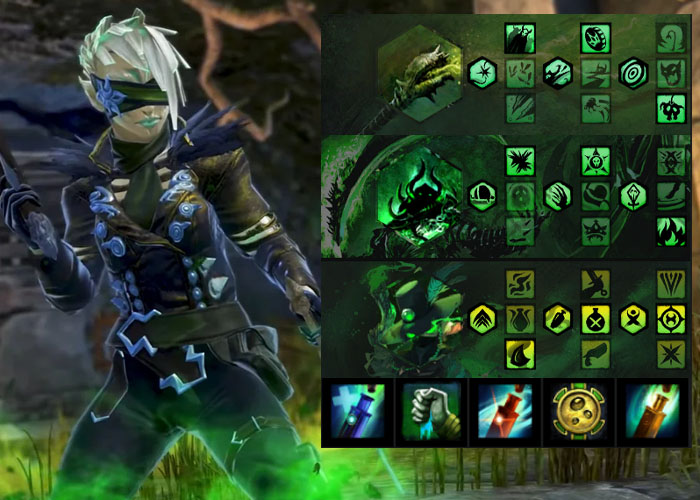
Necromancers have always been at the forefront of players using crazy builds in unique ways, making the user of death magic into one of the most awesome protectors of life. The condition damage dealing powerhouse often lends its prowess of corrupting their foe’s buffs into crippling debuffs to aid its teammates, but thanks to the rise of the Harbinger elite specialization, they can also provide some additional supportive skills to the table.
Why Condition Quickness Harbinger is great
- The Condition Quickness Harbinger is unlike its Necromancer elite specialization brethren, having access to some good mobility skills built into its Harbinger Shroud and skills.
- It doesn’t take long for the build to properly execute its skills and can be used on demand when needed.
- Despite it having a steep learning curve due to having to maintain some debilitating Blight stacks that lowers your maximum HP, it is an incredibly rewarding build for players that can balance it out.
Choose this build if:
- You are keen with using risky builds that will reward players well.
- You are a Necromancer-main who knows how to time their boon removal skills perfectly.
- You are determined to showcase how Harbingers can go toe-to-toe with its elite specialization brethren, the Scourge, in supporting its allies.
Full Build Details:
Major Perks and Traits
- Curses - Insidious Disruption, Master of Corruption, Lingering Curse
- Soul Reaping - Unyielding Blast, Soul Barbs, Dhuumfire
- Harbinger - Septic Corruption, Twisted Medicine, Deathly Haste
Equipment
- Armor - Viper’s stats (power, condition damage, precision, expertise)
- Infusion - Malign Agony Infusion (increases power and agony resistance) and Spiteful Agony Infusion (increases expertise and agony resistance)
- Runes - Rune of Tormenting (increases condition damage and Torment debuff duration)
- Relics - Relic of the Fractal (inflict Burning and Torment debuffs whenever you inflict more than 6 stacks of Bleeding debuffs)
- Trinkets - Viper’s trinkets
- Weapon set 1 - Viper’s stat main hand pistol and off hand dagger with Sigils of Torment (upon landing a critical hit, inflict Torment debuffs) and Bursting (increases condition damage)
- Weapon set 2 - Viper’s stat main hand scepter and off hand torch with Sigils of Torment and Bursting
Consumables
- Food - Cilantro and Cured Meat Flatbread (triggers Life Steal on a crit, increases condition damage, expertise, Karma, Magic and Gold find, and experience gained from all sources)
- Utility - Toxic Focusing Crystal (increases condition damage based on both your power and precision, and experience gained from kills)
Utility Skills
- Heal skill - Elixir of Promise - A Harbinger healing Elixir skill that grants healing and Regeneration buffs to you, then throws the bottle to inflict Poison debuffs on enemies and Blight onto the user.
- Skill 1 - Blood is Power - A core Necromancer Corruption skill that inflicts Bleeding on the user and the enemy but grants Might buffs for you and your allies.
- Skill 2 - Elixir of Anguish - A Harbinger Elixir skill that grants the user Swiftness and Quickness buffs, then throws the bottle to inflict Cripple debuffs on enemies and Blight onto the user.
- Skill 3 - Signet of Spite - A core Necromancer Signet skill that passively increases power stat and when activated inflicts debilitating conditions onto its enemies.
- Elite Skill - Elixir of Ambition - The Harbinger elite Elixir skill that grants the user with every buff then throws the bottle to inflict every debuff on enemies and Blight onto the user.
For more build details, check this link: Snowcrows.com
7. Alacrity Support Healer Druid
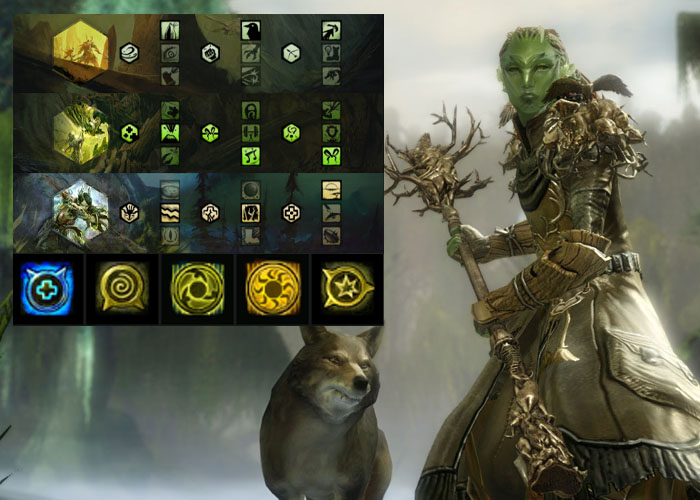
Druids, by their very nature, are the Ranger elite specialization that focuses entirely on supporting its teammates with its natural healing abilities. Its Celestial Avatar form provides its teammates with unparalleled healing and supportive skills that can quickly turn the tide of any encounter. The Alacrity Support Healer Druid complements any other healer on the team while providing other useful buffs on the table to keep the team fighting for much longer and to ensure victory.
Why Alacrity Support Healer Druid is great
- The Alacrity Support Healer Druid provides a whole range of offensive and defensive buffs on top of its already impressive healing ability.
- The Druid excels at long distance healing allowing itself to stay far away from any immediate danger while still being able to provide its support.
- You may swap out your staff for the long bow in case you need long distance DPS in the event that your team doesn't need additional healing as you can easily provide more with your Celestial Avatar form.
Choose this build if:
- You want to be a healer that specializes in long range healing.
- In a pinch, you can easily heal any of your allies and bring them to nearly full health after they have been downed.
- You are a Ranger-main who can specialize in proper positioning of your Spirit skills
Full Build Details:
Major Perks and Traits
- Skirmishing - Sharpened Edges, Spotter, Quick Draw
- Nature Magic - Wellspring, Windborne Notes, Invigorating Bond
- Druid - Cultivated Synergy, Verdant Etching, Grace of the Land
Equipment
- Armor - Harrier stats (power, healing, concentration)
- Infusion - Healing Agony Infusion (increases healing and agony resistance)
- Runes - Rune of the Monk (increases healing and boon duration)
- Relics - Relic of the Monk (after granting boons to your allies, increase healing)
- Trinkets - Harrier Amulet
- Weapon set 1 - Harrier stat main hand axe and off hand warhorn with OR with Sigils of Transference (increases outgoing healing) and Water (upon landing a critical hit, heal allies around you)
- Weapon set 2 - Harrier stat two handed longbow with Sigils of Sigils of Transference and Water
Consumables
- Food - Delicious Rice Ball (increases healing, outgoing healing, and magic find during the Lunar New Year Festival)
- Utility - Bountiful Maintenance Oil (increases outgoing healing based on both your healing power and concentration, and experience gained from kills)
Utility Skills
- Heal skill - Glyph of Rejuvenation - A Druid healing Glyph skill that greatly heals you and your pet, while also healing your allies.
- Skill 1 - Glyph of Equality - A Druid Glyph skill that inflicts Daze debuff on enemies while out of Celestial Avatar form and breaks you and your allies out of stun while in it.
- Skill 2 - Stone Spirit - A core Ranger Spirit skill that summons a Stone Spirit to grant Aegis buffs for you, your pet, and allies, while also inflicting Crippled and Weakness debuffs on your enemies.
- Skill 3 - Sun Spirit - A core Ranger Spirit skill that summons a Sun Spirit to inflict Blind and Burning damage onto foes while granting useful buffs to you, your pet, and your allies.
- Elite Skill - Glyph of the Stars - The Druid elite Glyph skill that heals allies, cleanses debuffs, and grants Stability buffs while out of Celestial Avatar form and prevents health drained while being downed, revives downed players, and grants them boons while within Celestial Avatar form.
For more build details, check this link: Metabattle.com
6. Power Alacrity Mechanist
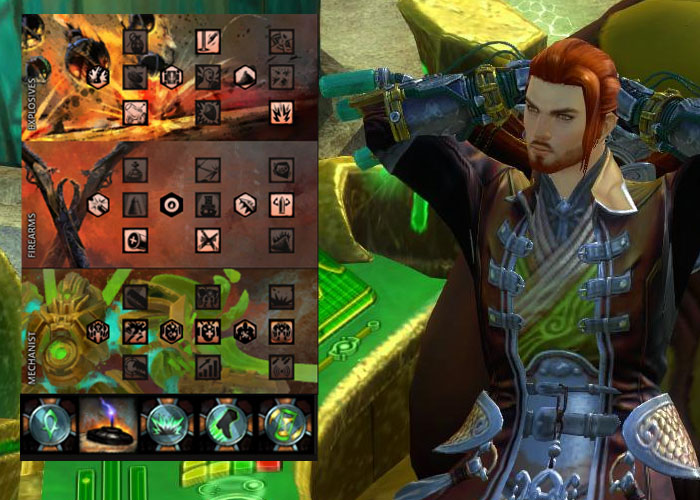
The Mechanist is often referred to as the medium-armor version of the Necromancer because of its Jade Mech companion. Although it controls more like the Ranger’s pet, it features more skills and benefits to the team thanks to its ability to be tweaked by switching perks around. As long as you and your allies stick close to the jade mac you will receive all of the necessary buffs that the team will be needing.
Why Power Alacrity Mechanist is great
- The Power Alacrity Mechanist has proven itself worthy of being called one of the best support as it has seen tons of usage in game not just in raids and strike missions but also in open world PvE.
- The build has proven itself to be known as one of the most powerful supporters in the game currently because of its ability to provide almost permanent Alacrity and Might buffs.
- The build functions almost exactly the same as a Power Cechanist; one of the leading power builds for the profession and those that are going to be using this build will find it to be very similar.
Choose this build if:
- You're a skilled Mechanist-main who knows how to wrangle their jade mech and position themselves between it and its allies.
- You can keep the stacks of Mechanical Genius alive for a decent amount of time and possibly go even further.
- You are willing to invest in the proper gear because the cost to equip a power alacrity mechanist can be a bit overwhelming.
Full Build Details:
Major Perks and Traits
- Explosives - Glass Cannon, Aim-Assisted Rocket, Big Boomer
- Firearms - High Caliber, No Scope, Modified Ammunition
- Mechanist - Mech Arms: High-Impact Drivers, Mech Frame: Channeling Conduits, Mech Core: Barrier Engine
Equipment
- Armor - Two pieces of Berserker stat armor (power, precision, ferocity), two pieces Assassin’s stat armor (precision, power, ferocity) and two pieces of Diviner’s stat armor (power, concentration, precision, ferocity)
- Infusion - Mighty WvW Infusion (increases power)
- Runes - Rune of the Scholar (increases power and ferocity)
- Relics - Relic of the Monk (after granting boons to your allies, increase healing)
- Trinkets - 4 pieces of Diviner’s trinkets and 2 pieces of Assassin’s trinkets
- Weapon set - Diviner’s stat two handed rifle with Sigils of Sigils of Force (increases outgoing damage) and Impact (increases strike damage against knocked down and stunned foes)
Consumables
- Food - Cilantro Lime Sous-Vide Steak (grants a chance to steal health on a critical hit, increases power and ferocity, Karma and all experience gained, and magic and gold find)
- Utility - Furious Sharpening Stone (increases both power and ferocity based on your precision)
Utility Skills
- Heal skill - Rectifier Signet - A Mechanist healing Signet skill that passively heals you and your Jade Mech, and when activated, grants additional healing.
- Skill 1 - Throw Mine - A core Engineer Gadget skill that throws a mine that inflicts Stun debuff on your enemies and removes boons from them.
- Skill 2 - Force Signet - A Mechanist Signet skill that passively increases strike damage and when activated knocks enemies away from both the user and their Jade Mech.
- Skill 3 - Shift Signet - A Mechanist Signet skill that passively increases the user’s movement speed and when activated teleports both the user and its Jade Mech to the target area.
For more build details, check this link: Hardstuck.gg
5. Condition Alacrity Renegade
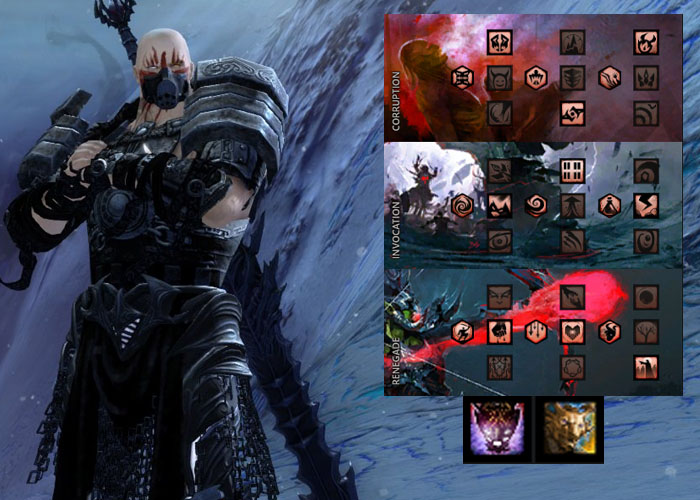
The renegade is the elite specialization of the revenant that specifically has tons of area of effect skills that can be used both offensively and defensively. One of these mostly known to be one of the more dps oriented professions the aoe skills can be used to provide tons of buffs for allies while at the same time inflicting damage. As the name suggests this renegade build focuses on pumping out tons of condition damage while providing support that your teammates will appreciate.
Why Condition Alacrity Renegade is great
- The Condition Alacrity Renegade has been a long standing popular build that showcases the deepest potential of the Renegade while also being a support powerhouse in its own right.
- It can provide near permanent Alacrity buffs for allies by simply using a few skills and timing it just right in order for it to speed up the cooldowns of the skills and weapons of their teammates
- When needed this build can provide tons of crowd control to prevent the enemies from getting an upper hand on you and your teammates.
Choose this build if:
- You are an experienced revenant main who can balance the energy cost mechanic.
- You know how to properly position your area of effect skills in order to provide as much Alacrity and Might for yourself and your party.
- You are currently lacking support and need more Alacrity uptime.
Full Build Details:
Major Perks and Traits
- Corruption - Acolyte of Torment, Pact of Pain, Diabolic Inferno
- Invocation - Rising Tide, Spirit Boon, Charged Mists
- Renegade - Blood Fury, Heartpiercer, Righteous Rebel
Equipment
- Armor - Ritualist’s stats (vitality, condition damage, concentration, expertise)
- Infusion - Malign WvW Infusion (increases condition damage)
- Runes - Rune of the Trapper (increases condition damage and duration)
- Relics - Relic of the Fractal (inflict Burning and Torment debuffs whenever you inflict more than 6 stacks of Bleeding debuffs)
- Trinkets - Ritualist’s trinkets
- Weapon set 1 - Ritualist’s stat main hand mace and offhand axe with Sigils of Doom (upon switching to this weapon set, your next attacks will inflict Poison debuffs) and Earth (upon landing a critical hit, inflict Bleeding debuffs)
- Weapon set 2 - Ritualist’s stat two handed shortbow with Sigils of Geomancy (upon switching to this weapon set, inflict Bleeding debuffs) and Torment (upon landing a critical hit, inflict Torment debuffs)
Consumables
- Food - Cilantro and Cured Meat Flatbread (triggers Life Steal on a crit, increases condition damage, expertise, Karma, Magic and Gold find, and experience gained from all sources)
- Utility - Magnanimous Tuning Crystal (increases condition damage based on your vitality and toughness, and Experience gained from kills)
Utility Skills
Because Revenants and their elite specializations rely on their Legendary Stances to get unique sets of utility skills, we will only describe the stances used.
- Legendary Demon Stance (Mallyx) - Focuses on debilitating status effects which revolve around inflicting Torment debuffs and others.
- Legendary Renegade Stance (Khalla) - Launches area-of-effect attacks that inflict large amounts of damage, buffs, and has access to one of the most powerful healing skills in the game.
For more build details, check this link: Hardstuck.gg
4. Aegis Heal Chronomancer
The Chronomancer has been one of the most versatile professions in the game since its introduction in Heart of Thorns. With its use of time manipulation at its side, this elite specialization of the Mesmer is one of the more prominent support roles for the class and has proven its mettle in combat. It is no stranger to combat and will protect its allies and provide the ever useful Alacrity and Aegis buffs to shield its allies.
Why the Aegis Heal Chronomancer is great
- The Chronomancer’s Continuum Split is its most vital skill as it reverts the cooldown, health, and status of the user before it used the skill.
- Not only is the Aegis Heal Chronomancer a worthy support build, it can double as a tank as it can take as much damage before simply rewinding all of that damage back with its continuum split.
- Thanks to the perks chosen, the Chronomancer is able to heal its allies using the initial casting of the Mantra skills and the final pulse of the Well skills.
Choose this build if:
- You are a dedicated Mesmer/Chronomancer-main who loves taking on the support role and will protect the team at all costs.
- You are the type of player who can perfectly time your Continuum Split Shatter skill to perform an emergency heal dump.
- You can time providing Aegis to your allies that are wide open for an attack, saving them from a potentially lethal hit.
Full Build Details
Major Perks and Traits
- Inspiration - Restorative Mantras, Ego Restoration, Restorative Illusions
- Chaos - Illusory Defense, Chaotic Transference, Bountiful Disillusionment
- Chronomancer - All’s Well that Ends Well, Improved Alacrity, Seize the Moment
Equipment
- Armor - Minstrel stats (toughness, healing, vitality, concentration)
- Infusion - Mystical Agony Infusion (increases concentration and agony resistance)
- Runes - Rune of Water (increases healing and boon duration)
- Relics - Relic of the Herald (upon granting allies with boons, increase your concentration stat)
- Weapon set 1 - Minstrel stat main hand sword and off hand shield with Sigils of Concentration (increases boon duration) and Paralyzation (increases Stun debuff duration)
- Weapon set 2 - Minstrel stat main hand scepter and off hand focus with Sigils of Concentration and Transference (increases outgoing healing)
Consumables
- Food - Delicious Rice Ball (increases healing, outgoing healing, and magic find during the Lunar New Year Festival)
- Utility - Bountiful Maintenance Oil (increases outgoing healing based on both your healing power and concentration, and experience gained from kills)
Utility Skills
- Heal skill - Mantra of Recovery - A core Mesmer healing Mantra skill that channels healing to be used after.
- Skill 1 - Mantra of Resolve - A core Mesmer Mantra skill that channels the skill to remove debuffs on you and your allies once used.
- Skill 2 - Well of Precognition - A Chronomancer Well skill that drops an area-of-effect on the targeted area that provides allies with Aegis buffs, breaks them out of stun, and once it ends, provides Endurance.
- Skill 3 - Mantra of Concentration - A core Mesmer Mantra skill that channels the skill to break out of Stun and grant Stability buffs for you and your allies.
- Elite Skill - Gravity Well - The Chronomancer elite Well skill that drops an area-of-effect on the targeted area that sucks in enemies to its center, dealing heavy pulsing damage, damages break bars, and acts as a Dark combo field.
For more build details, check this link: GuildJen.com
3. Power Quickness Herald
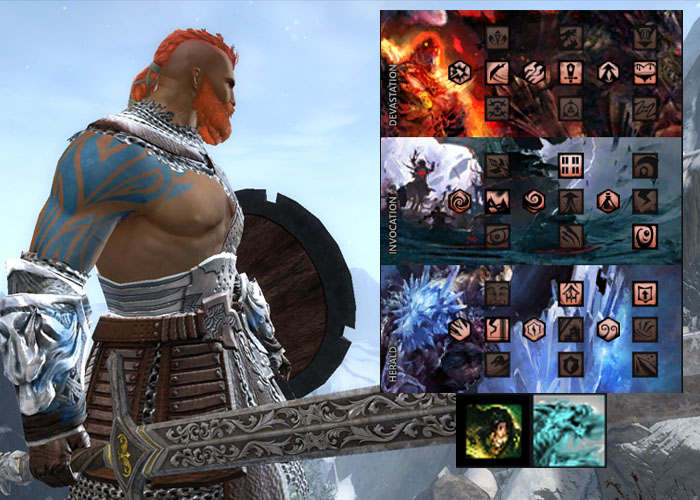
The Herald is one of the most versatile elite specializations of the Revenant because of its ability to use its Facet skills similarly to Signet. They can share the boons provided by the facets passively without any other additional input making them one of the best passive supporters in the game. Thanks to the Secrets of the Obscure expansion and the Weaponsmaster Training, they gain access to the Vindicator’s greatsword, allowing the Herald to have more damaging cleaving damage.
Why the Power Quickness Herald is great
- The Power Quickness Herald can easily provide your teammates with Might, Fury, Quickness, Protection, and Swiftness buffs, covering a good amount of offensive buffs.
- This build can be easily used by beginners allowing them to learn the play style of a Herald.
- Thanks to the Facet of Nature skill, it can extend the duration of current buffs that the Herald shares allowing for more boon uptime.
Choose this build if:
- You are a beginner Herald player and have been looking for an easy to use build that you can use to help your party.
- You want to be able to help your teammates in providing Quickness buffs by simply using your energy draining skills.
- You need a profession that has easy access to crowd control skills in case the team needs it within a moment notice especially when the enemy has break bars.
Full Build Details:
Major Perks and Traits
- Devastation - Unsuspecting Strikes, Notoriety, Swift Termination
- Invocation - Rising Tide, Spirit Boon, Roiling Mists
- Herald - Core Value, Shared Empowerment, Elevated Compassion
Equipment
- Armor - Berserker stats (power, precision, ferocity)
- Infusion - Mighty WvW Infusion (increases power)
- Runes - Rune of the Holosmith (increases power, vitality, and precision)
- Relics - Relic of Fireworks (increases outgoing strike damage if you used a weapon skill with a recharge time of 20 seconds or greater)
- Trinkets - Marauders trinkets (power, precision, vitality, ferocity)
- Weapon set 1 - Marauder stat main hand sword and off hand dagger with Sigils of Air (when you land a critical hit, strike your foe with lightning) and Blood (whenever you deal a critical hit, steal some health)
- Weapon set 2 - Marauder stat two handed shortbow with Sigils of Bloodlust (increases power for each enemy you killed with this weapon set up to a maximum of 25 stacks) and Energy (upon switching into this weapon set from a different elemental attunement, you gain back Endurance while in combat)
Consumables
- Food - Cilantro Lime Sous-Vide Steak (grants a chance to steal health on a critical hit, increases power and ferocity, Karma and all experience gained, and magic and gold find)
- Utility - Furious Sharpening Stone (increases power based on both your precision and ferocity)
Utility Skills
Because Revenants and their elite specializations rely on their Legendary Stances to get unique sets of utility skills, we will only describe the stances used.
- Legendary Assassin Stance (Shiro) - Focuses on single target attacks that can help to close the gap or dodge out of the way from deadly attacks. The Elite is a massive CC, capable of shredding defiance bars and temporarily stunning enemies while you go in for the kill or run away from bad matchups.
- Legendary Dragon Stance (Glint) - The Facet skills act like Signets that need to be activated first in order to use up a portion of your energy to maintain certain buffs. When activated again, it will release the secondary effect of the skills. The elite is a massive knockdown skill when activated twice which is useful for knocking away players trying to stick with groups.
For more build details, check this link: Hardstuck.gg
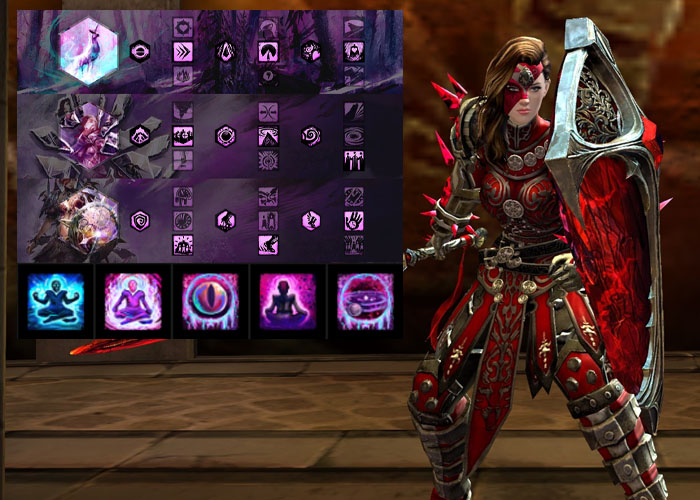
2. Alacrity Support Healer Scourge
Whenever you have to talk about the best supporters in Guild Wars 2, among the top three will always be a Scourge on the list. It has always been known as one of the absolute best supporters in the game thanks to its ability to share Barriers with its teammates and prolonging their games because of their clutch saves. The Scourge will always be among the favorite professions to provide support for the team thanks to its utility and ease of use.
Why Alacrity Support Healer Scourge is great
- The Alacrity Support Healer Sourge has always been at the forefront of the best support units in the game and has proven its mettle more than once in raids and strike missions.
- The build has proven itself useful as well and open world PvE, showcasing its flexibility even in an open world setting.
- The build is capable of providing amazing utility, granting near permanent Fury, Protection, and Might buffs for its allies, but what sets it apart from the rest is its renowned ability to resurrect its downed allies with ease.
Choose this build if:
- You want one of the absolute best support units in the game with an amazing resurrecting ability.
- You can easily spread your Barriers around with the proper placement of your Sand Shades.
- Despite the build being nerfed multiple times in the past, it still sees continued usage as it remains to be a powerful supporter that simply can’t be denied.
Full Build Details:
Major Perks and Traits
- Blood Magic - Ritual of Life, Life from Death, Transfusion
- Soul Reaping - Unyielding Blast, Fear of Death, Eternal Life
- Scourge - Abrasive Grit, Sandstorm Shroud, Desert Empowerment
Equipment
- Armor - Harrier stats (power, healing, concentration)
- Infusion - Healing Agony Infusion (increases healing and agony resistance) and Mystical Agony Infusion (increases concentration and agony resistance)
- Runes - Rune of the Monk (increases healing and boon duration)
- Relics - Relic of the Monk (after granting boons to your allies, increase healing)
- Trinkets - Harrier trinkets
- Weapon set 1 - Harrier stat main hand dagger and off hand warhorn with Sigils of Transference (increases outgoing healing) and Water (upon landing a critical hit, heal allies around you)
- Weapon set 2 - Harrier stat off hand torch Sigil of Water
Consumables
- Food - Delicious Rice Ball (increases healing, outgoing healing, and magic find during the Lunar New Year Festival)
- Utility - Bountiful Maintenance Oil (increases outgoing healing based on both your healing power and concentration, and experience gained from kills)
Utility Skills
- Heal skill - Well of Blood - A core Necromancer Well skill that drops an area-of-effect heal that also acts as a Light combo field.
- Skill 1 - Desiccate - A Scourge Punishment skill that inflicts damage onto your surrounding enemies to provide the user with Life Force for their Sand Shroud, grants buffs to yourself and your allies, and converts the enemies’ buffs into Torment debuffs.
- Skill 2 - Serpent Siphon - A Scourge Punishment skill that grants Barrier to allies and inflicts debuffs on your enemies, as well as turning their buffs into Torment debuffs.
- Skill 3 - Optional Skill - Pick a skill that fits the needs of the party, the situation, or whatever is currently lacking.
- Elite Skill - Summon Flesh Golem - The core Necromancer elite Minion skill that summons a Flesh Golem to your side that can provide a knockdown attack upon command.
For more build details, check this link: Metabattle.com
1. Booster Firebrand
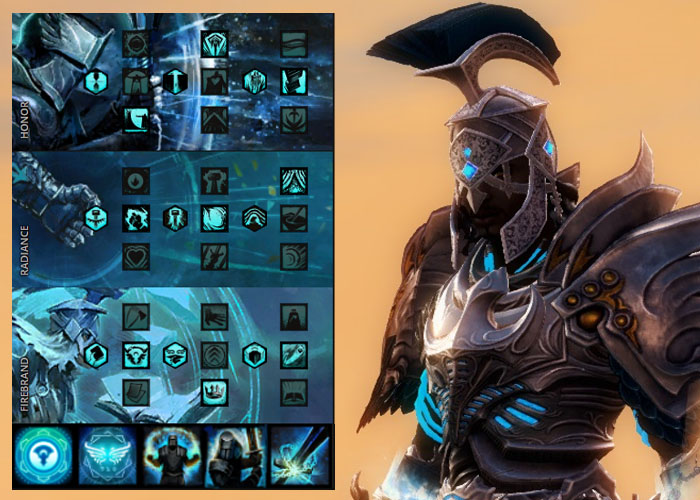
If you want one of the absolute best support units that you can use as well as being one of the simplest and easiest to equip especially if you bought the Path of Fire expansion, look no further than the Guardian’s second elite specialization, the Firebrand. It has proven itself to be the most dominant support unit because of how many skills it has to protect its allies and use its many support buffs for any occasion. There is a reason why it stands alone at the summit and looks down upon its throne of the best support units for such a long time.
Why Booster Firebrand is great
- If you purchased any of the expansion packs, you will gain access to a Level 80 Booster that you can use to bring a new character all the way up to level 80 and have all of the gear necessary to build a booster Firebrand.
- To build is extremely beginner friendly and can be used in open world PvE and even instance combat like Raids and Strike Missions.
- You simply cannot go wrong in using this build as there are so many ways to use all of your abilities to provide excellent support.
Choose this build if:
- You want an easy-to-build Firebrand build that can be used immediately as long as you have the hero points to unlock the skills.
- Your teammates are currently looking for a dedicated support unit with extreme amounts of healing and you are just the right person who can provide that.
- You easily get into the fray and have no fear challenging your phones as long as you're able to also equip your allies with the buffs necessary, whether it is offensive or defensive.
Full Build Details:
Major Perks and Traits
- Honor - Protector’s Restoration, Honorable Staff, Writ of Persistence
- Radiance - Right-Hand Strength, Radiant Fire, Amplified Wrath
- Firebrand - Liberator’s Vow, Legendary Lore, Quickfire or Loremaster
Equipment
- Armor - Celestial stats (increases all stats)
- Infusion - Mighty WvW Infusion (increases power)
- Runes - Rune of the Firebrand (increases condition damage, Quickness buff duration, and boon duration)
- Relics - Relic of the Monk (after granting boons to your allies, increase healing)
- Trinkets - Celestial trinkets
- Weapon set 1 - Celestial stat main hand axe and off hand torch with Sigils of Smoldering (increases outgoing Burning debuff duration) and Bursting (increases condition damage)
- Weapon set 2 - Celestial stat two handed staff with a Sigil of Transference (increases outgoing healing) and Smoldering
Consumables
- Food - Delicious Rice Ball (increases healing, outgoing healing, and magic find during the Lunar New Year Festival)
- Utility - Bountiful Maintenance Oil (increases outgoing healing based on both your healing power and concentration, and experience gained from kills)
Utility Skills
- Heal skill - Mantra of Solace - A Firebrand healing Mantra skill that channels the skill, and when activated, provides healing and buffs for the user and their allies in a cone shape in front of the user.
- Skill 1 - Mantra of Potence - A Firebrand Mantra skill that channels the skill, and when activated, provides Quickness and Might buffs for allies in a cone shape in front of the user.
- Skill 2 - Purging Flames - A core Guardian Consecration skill that drops an area-of-effect ring of fire on a target area that removes debuffs of allies and acts as a Fire combo finisher.
- Skill 3 - “Stand Your Ground!” - A core Guardian Shout skill that provides Stability buffs for you and your allies and acts as a stun break.
- Elite Skill - “Feel My Wrath!” - The core Guardian elite Shout skill that provides both Fury and Quickness buffs for you and your allies with the bonus of doubling the duration of Quickness you grant to yourself. The skill also functions as a stun break.
For more build details, check this link: Hardstuck.gg
Closing Thoughts
Support units in Guild Wars 2 function more than just simply healing an ally. The best support units provide more utility to help their teammate survive longer and to hit even harder to make encounters in the open world or instanced encounters more doable. If you want to thrive as a supporter in the game, remember that the Hipocratic Oath and to “first do no harm,” and when your enemies start attacking, “second eliminate those who harm my buddies.”
You may also be interested in:
Share this Article:

- Log in or register to post comments


")


")


")
")


")


")


")


