 Home
Home PC Game Trailers
 News
News Menu
Menu[Top 10] Marvel Snap Best Free Decks That Are Excellent
Updated: 22 Dec 2022 1:10 am

Take out your opponents with these quality free decks
 BY: James Speedy
Technically, you never have to spend a dime in Marvel Snap to have a powerful and competitive deck. That said, if you crave variety, the grind to unlocking the latest and greatest cards is an arduous one. To unlock cards, you need credits. To get credits, you need to complete missions. And to complete missions, you need to play the game. You have to do all this if you want to progress, or at least if you want to do so while keeping your credit card stashed safely in your wallet.
But we’re here to help. This list of decks, comprised of only Pool 1 and 2 cards, will aid and abet you on your way. Whether your goal is Infinite Rank or unlocking every Pool 3 card, these decks - and this guide - will assist you on that quest. If you can master even one, you can be competitive and have fun while doing it.
10. Jubilee Highroller

This deck is maybe one of the riskier choices in this list. It is playable but it relies on luck more than others.
I’ll go over some synergies you can utilize to play this deck to its fullest.
Sunspot and Armor: If you can play Sunspot turn 1 and Armor turn 2, you have a potential location win on your hands. And, on top of that, you will never waste you turn's energy because Sunspot will soak it up and turn it into power. Armor is important because, while it’s tempting to buff Sunspot on turn 2, Sunspot is a cost-1 and therefore a prime target for a Killmonger or Elektra attack.
Storm and Jessica Jones or Jubilee: Storm into Jessica Jones is one of the classic Pool 2 maneuvers. When you have an empty location, and especially if that location has a negative condition, why not swap it for a shut-down location and a guaranteed 10 power? Alternatively, you can play Storm into Jubilee on turns 3 and 4, but this move might require you to either a) know that you only have heavy hitters left in your deck or b) have extremely good luck and always pull Infinaut. Remember that Jubilee draws from your deck and not your hand, so don’t play her if you only have low-cost cards in your deck or it’s empty.
The ideal win condition with this deck is that you play Jubilee in her own location and she pulls Odin, who re-triggers Jubilee to pull Infinaut for a whopping 29 power return on a 4-cost card. But again, while this is an incredible result, it is not a reliable one, so proceed with caution. This deck is high in fun quotient but potentially low in win percentage.
9. Den’s (and everyone else’s) Pool 2 Movement
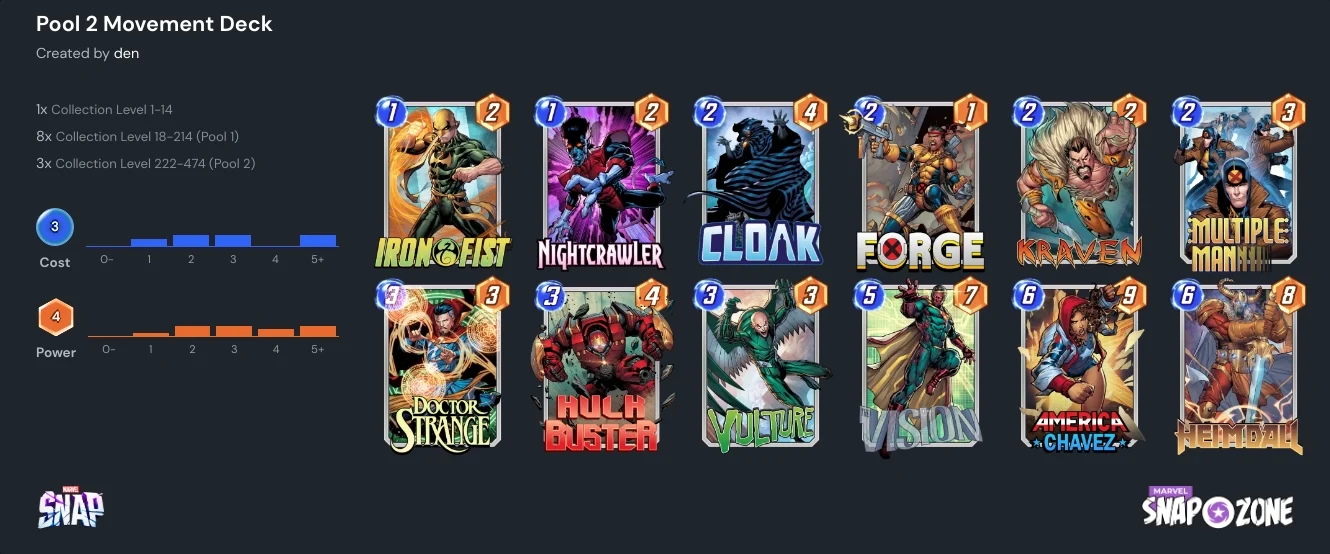
There is a reason you see a ton of Move archetype decks in Pool 2. While they are a little tricky to master, the power potential is high. And all of this is accomplished without any Pool 3 cards.
Yes, you can add Dagger or Human Torch for some low-cost, high-power swaps, but most of the key pieces don’t change no matter how many cards you acquire.
That said, playing a Move deck requires you to keep in mind a few specific plays that will get your power…ummm…moving.
Multiple Man and everything: Multiple Man is the workhorse of the Move deck. Merge him with Hulk Buster and now you can drag 7 power Multiple Man clones to all locations. Play Iron Fist before him and you will start the game with Multiple Man in two locations (assuming you don’t play him in the left-most location first). Duplicate your Hulk Buster-infused Multiple Man and then play Doctor Strange to make 2 more copies of Multiple Man. There are a lot of options so long as your opponent doesn’t block you and you get conducive locations.
Vulture: Vulture plays a bit like Multiple Man but with the drawback being that there is only one of him. But what Vulture brings to the table is that he gets more powerful with each move. So, if you punch him with Iron Fist and then use Doctor Strange or Cloak, you’ll have a 13-power Vulture on your hands.
Heimdall: This is the key card for the whole deck and often what makes or breaks a Move deck game. Remember when I said to not play Multiple Man into the left location if you want to use Iron Fist? Well, ideally you don’t want any of your Move-buffed cards in the left location because your last turn will push all your cards one location to the left. Heimdall adds a ton of power to the two left locations, in addition to his own 8. This must be a critical part of location planning when playing Move decks. Playing Heimdall can win a game or do essentially nothing depending on where your cards are on turn 6.
8. Pool 2 Discard
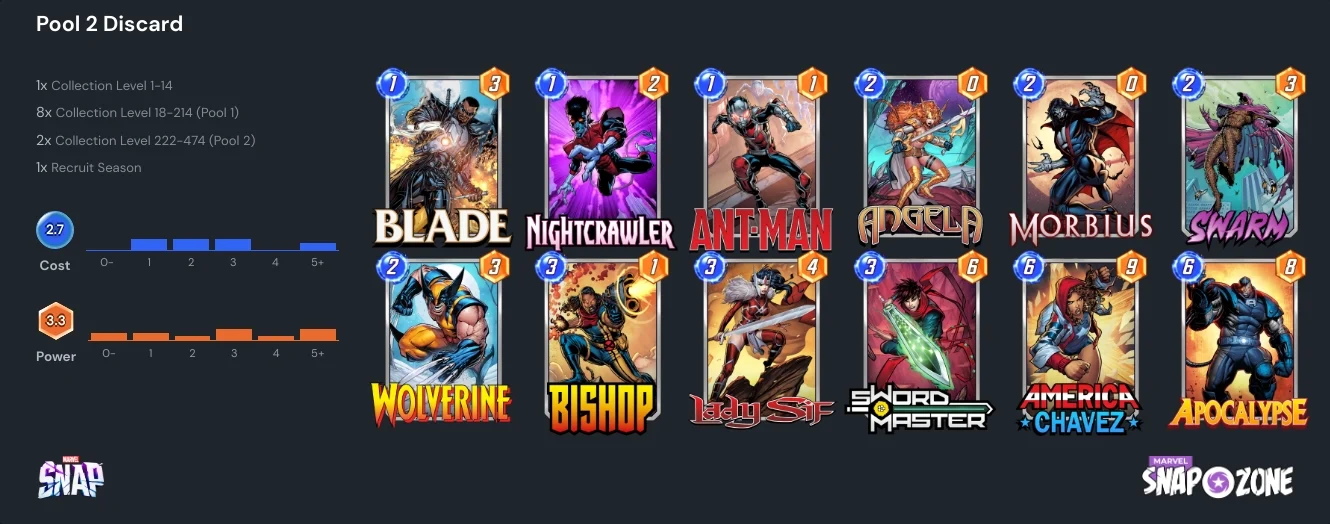
Pool 2 Discard decks have a few options for how you set them up.
Some players like to add a disruptive 1-cost like Iceman or Korg. This hampers your opponent a little and can disrupt their intended plays by increasing a key card’s cost, stopping them from playing two cards at once or worse yet, having them draw a rock instead of a card. That said, these are small disruptions and their impact on the game is often minor.
So, for me, I prefer this more straightforward iteration of the Discard deck. Every card is either buffed by cards in your hand when they’re discarded, buffed by played cards or buffed when they are discarded from your hand.
This archetype can take a lot of getting used to and it’s also very important to understand the distinction between a destroyed card and a discarded one. If you play Swarm from your hand and it is destroyed, nothing will happen. But, if you play Blade and he discards Swarm from your hand, two 0-cost Swarms will replace that single card and you can play them wherever you like.
Utilizing key cards like Lady Sif - to target Apocalypse - and Morbius - who can be played at any time in the match but benefits from your total discards - will generate your location power. It’s worth being careful with cards like Sword Master and Blade because they are indiscriminate in who they discard. They might slice up Wolverine - which will play him to a random location - or Bishop - which will just make you cry.
7. Move Disrupt

This deck is of my own creation but I can't really take credit. While I put it together without a guide, I am certainly not the first person to engineer a Move deck with a Disrupt package.
The strategy for playing this deck is everything you learned playing the Pool 2 Movement deck but with a few Disrupt cards thrown in to counter your opponent.
I’ll quickly outline why I subbed in Enchantress, Shang-Chi and Killmonger.
Enchantress: Enchantress is the queen of disrupt cards in the early game as she can shut down an Ongoing ability and, especially if you play her on turn 6, completely turn around a location. If your opponent has, say, Iron Man, Mister Fantastic and Captain America in one location, Enchantress will end all their abilities at once. This can make a huge difference to a location’s final power.
Killmonger: The last day most players use the Zoo deck archetype is when they encounter their first Killmonger. For 3-cost and 3 power, this ultimate disrupt card destroys any unprotected 1-cost card on the board. That means every buffed squirrel, Ant-Man and Hawkeye wiped out by one card. It’s fantastic when you play it and nothing hurts more than watching your entire army disappear when your opponent does. Fear and respect Killmonger.
Shang-Chi: The ultimate shutdown card. In a way, Shang-Chi is to Killmonger as a shotgun is to a sniper rifle. You see, Shang-Chi only targets cards in the same location and only if they are 9 power and above. So, while he will kill any card that has over 9 power (assuming his On Reveal skill activates and there is no Armor), he can only kill in one location. This makes him a well suited play if you have priority on turn 6 and are close to winning.
6. Hoogland’s Chavez Midrange
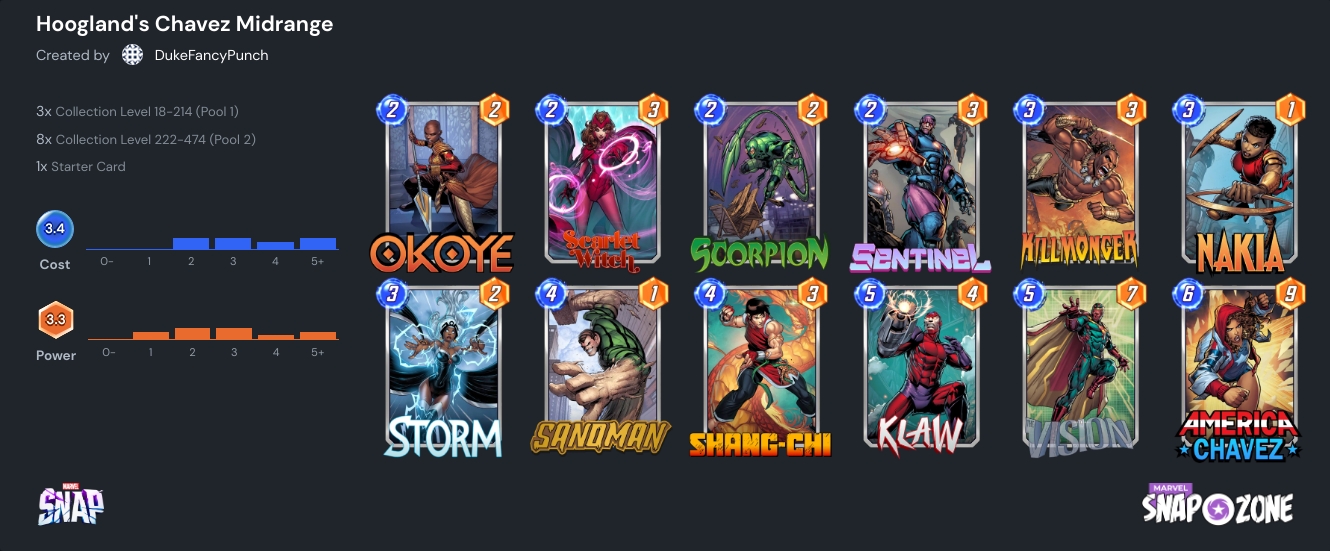
Chavez Midrange is one of a few great examples of a solid deck that incorporates both disruptive elements and strong utility cards. This is also the first of three decks in this list constructed by Marvel Snap guru, Jeff Hoogland. Mr. Hoogland is a former Magic the Gathering pro, mathematician and streamer. On top of this, he is a veritable font of information on the best Marvel Snap decks, synergies and tech.
Playing this deck, there are two things to consider: can you predict what your opponent is planning and in what order your cards will be drawn?
The answer to the second question, at least, is made more consistent with the inclusion of America Chavez. Her flavor text says that she will always be drawn on turn 6. This does two things to help you win. The first is guarantee that you have a fairly high power card to play on turn 6 in every single match. The second is that you know she will not be drawn on turns 1 through 5, which increases the likelihood that you will draw cards you need before then. This is an undervalued mechanic as it makes your draws more reliable and leaves you less likely to have nothing to play in a round.
Besides AC, there are your standard disrupt cards like Killmonger and Shang-Chi. But an additional useful skill card is Sandman. If you suspect that your opponent is planning to play a ton of cards on turns 5 or 6, Sandman will slow their roll by limiting them to one card per turn. This can really hamper a Swarm or Miracle deck that rely on dropping a ton of low-cost cards at endgame.
5. Ongoing Spectrum
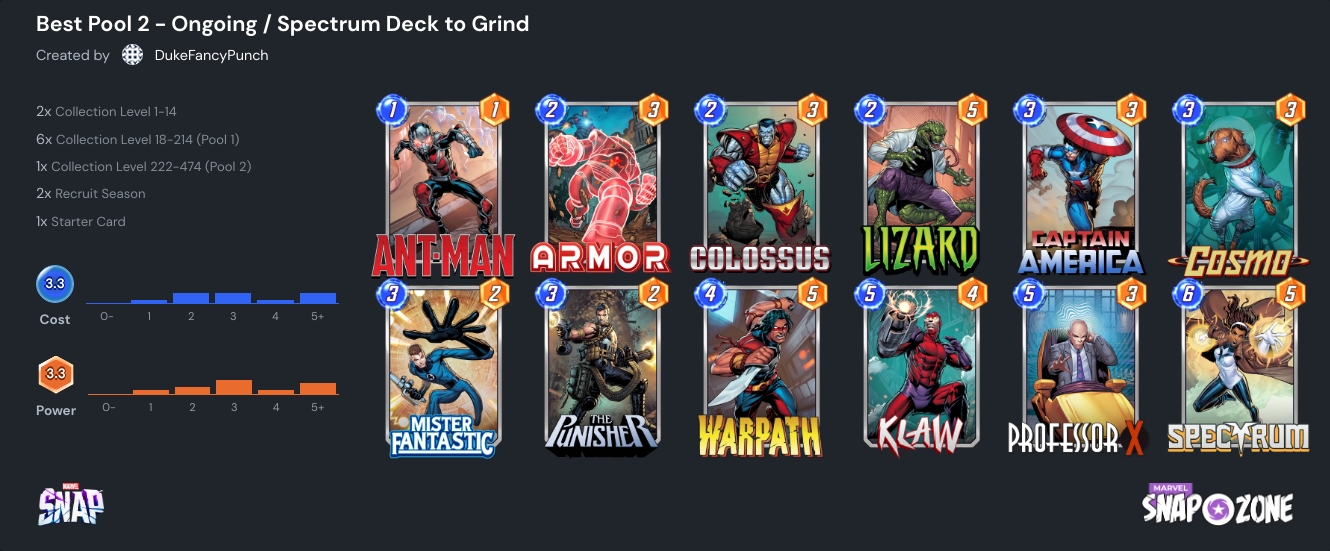
There are a few ways to outfit an Ongoing deck, even in Pool 2. The reason I chose this particular iteration, is the balance it strikes between disruptive elements - like Professor X and Cosmo - and powerful cards.
The idea behind this deck is to use all the tools at your disposal to get as much power in each location as possible (and ideally as many cards too). Then, on turn 6, you play the only On Reveal card in your deck, Spectrum.
Now, this does mean that the deck is extremely hampered if you don’t draw Spectrum before turn 6. But, if you do, she will send 2 power to every card besides her that you’ve played in the game. This can be a tidal shift in every location if you set them up right.
4. Hoogland’s Collector Midrange
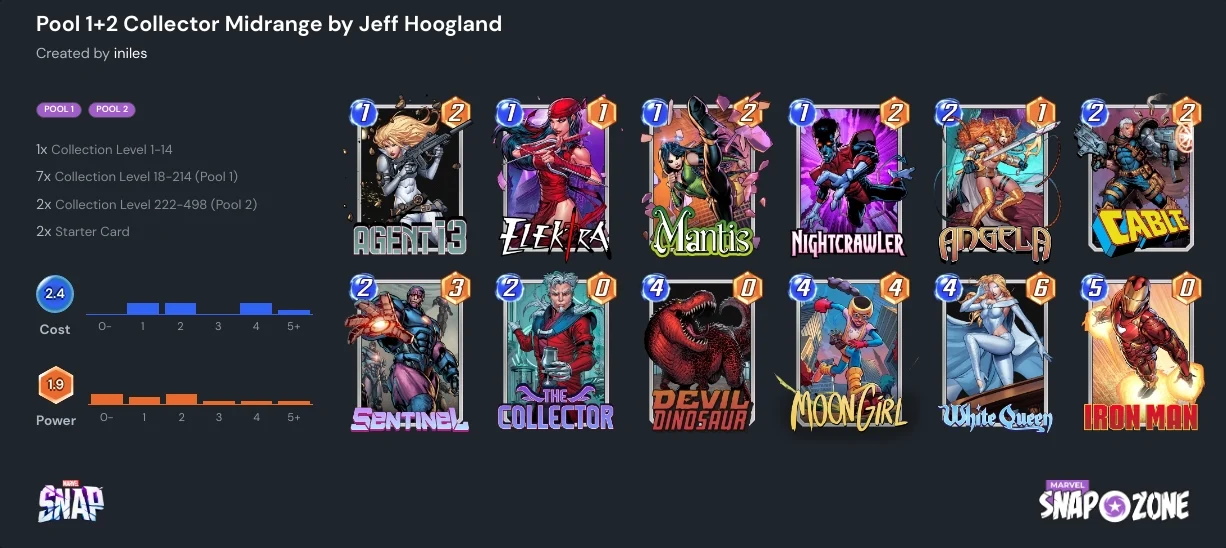
The second Jeff Hoogland contribution in this list is another Midrange entry, Collector Midrange.
While at first glance this deck seems to rely on the standard Devil Dinosaur and Moon Girl synergy, the addition of The Collector pushes your power into at least one other location.
The two key cards here are the namesake of the deck, The Collector, and Devil Dinosaur. Nearly every other card in this deck is working to increase the power of one or both of these cards.
The Collector gains 1 power each time a card enters your hand from a place that isn’t your deck. So when you play Cable and steal an opponent’s card, he gains power. When you play Sentinel and get a copy of Sentinel, he gains power. When you use Moon Girl to dupe your hand or White Queen to make a copy of your opponent's highest cost card well…you get the picture.
Once you play The Collector, just about every other action you do to keep your hand full of cards, and your Devil Dinosaur monstrous, will strengthen him.
One hot tip from me to you on using this deck optimally is to save Agent 13 for turn 6. While it’s tempting to play her on turn 1 or another random turn to use up extra energy, there is a reason to hang on to her. On turn 6, whether you play Devil Dinosaur or Iron Man, you will have 1 energy left. Then, you can play Agent 13 which adds 2 power to a location, replaces her spot in your hand so Devil Dinosaur's power isn't reduced and gives 1 more power to The Collector.
3. Cozy Snap’s Control Destroy

As we near the top of this list, we’re starting to get into some of my favorite archetypes in Pool 2. Cozy Snap is another Marvel Snap content creator with a glut of useful videos for both new and seasoned Snappers.
His “The BEST Destroy Deck to Reach Infinite Easy!” guide, while a click-bait title, turned me on to the power potential of this menacing archetype. I straight lifted the Control Destroy deck option from that vid and taught myself to love destruction.
While you can utilize the Destroy package within the deck to lockdown one or two locations, it’s the inclusion of the control elements that can maintain your lead.
In one location you could feed your 1-cost cards and Bucky Barnes to Carnage or blow them up with Deathlok. In another, you can peek at your opponents deck with White Queen, reduce all their cards in a location by 1 power with Spider-Woman or pull the 1-2 punch of Storm into Jessica Jones.
What I like about this deck are the myriad options of blocks and buffs you can use. The inclusion of American Chavez is the cherry on top to better control your draws and as a decent turn 6 power play.
2. Zoo Disrupt
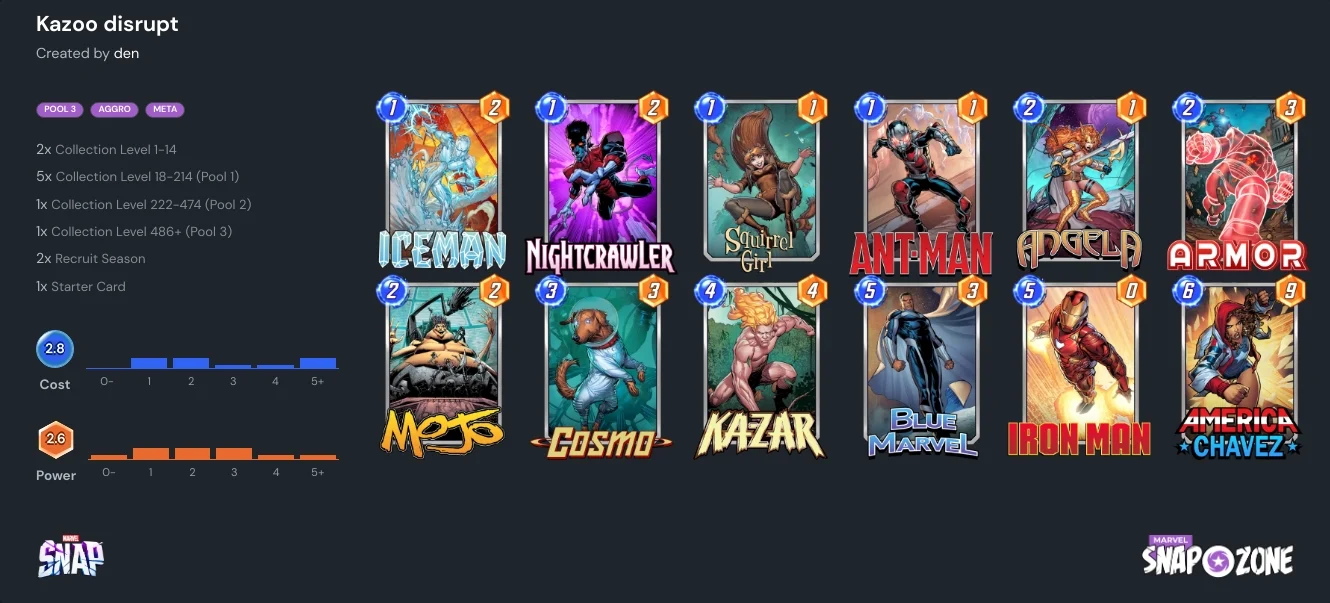
And yet again, it’s another list of Marvel Snap decks that inexplicably includes a Zoo archetype. Bet you thought you wouldn’t see it on this list. But, for every person who leaves it in the dust of Pool 1, there is someone else claiming it can compete in high rank.
Seriously, I’ve had conversations with other Snap players who insist that, when played well, you can get within spitting distance of Infinite (the highest rank in Marvel Snap) with a slightly modified Zoo deck.
Well, who am I to swim against the current? So I did my research and found a Pool 2 version of the Zoo deck that I actually like. It’s also super easy to modify for even more power as you accrue Pool 3 cards.
I won’t bore you with the now familiar play-by-play of the Zoo archetype. You already know to cover the board in low-cost cards and use a combination of Ka-Zar and Blue Marvel to make them cute little powered-up monsters. But what I like about mixing the Zoo and Disrupt archetypes are the different ways you can block other decks from gaining ground while slowly shoring up your power.
Both the previously mentioned Iceman and Korg are great early plays, as they can disrupt your opponents draws handily. You can also use Armor to shield a location your opponent is planning for a Destroy package (hint: when you see Nova and Bucky Barnes together) or to protect your little furry friends.
Nightcrawler allows you access to Sanctum Sanctorum and Storm’d locations. And my personal favorite, Cosmo, prevents all On Reveal plays in one location.
1. Hoogland’s Pool 2 Disrupt Deck
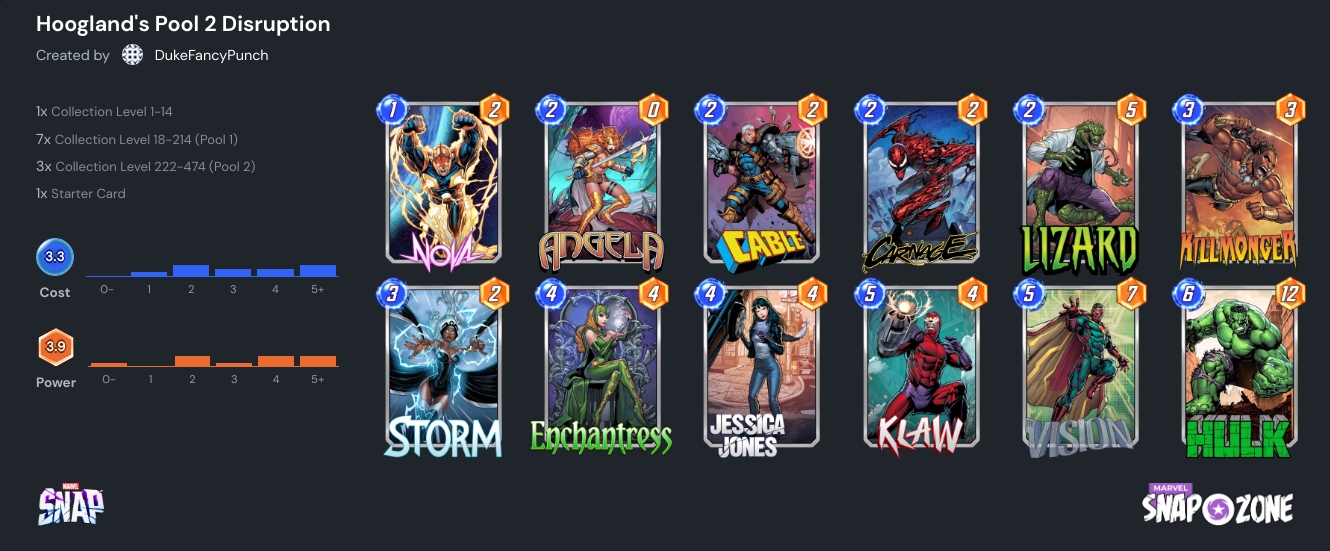
Finally, we have my number one pick for the Marvel Snap Best Free Decks That Are Powerful, the Pool 2 Disrupt deck.
It’s our last gift from Mr. Hoogland and also my number one recommendation for players who have all the cards in Pool 2 but find themselves struggling in matches.
But, you’ll say, I don’t have any Pool 3 cards, how can I compete? To this, I reply, by blocking each and every archetype with this nifty deck made especially for you.
Need to kill a location full of powerful Ongoing skills? Play Enchantress! Need to lockdown an empty location or get rid of a bad location ability? Play Storm! And then probably play Jessica Jones to beef it up.
There are so many great options in this deck to capitalize, counter and counter-attack, that it is the ideal solution to no-Pool-3-cards-itis.
My hot tip for you is that, if you encounter Bar Sinister while running this deck, play Vision into it. On turn 6, you now have 4 copies of Vision that you can move to the other two lanes. Then, you can fill Bar Sinister with another card (ideally Hulk) and get the best of both worlds.
You may also be interested in:
Share this Article:

- Log in or register to post comments


")


![[Top 5] Control Best Weapons (And How to Get Them)](https://www.gamersdecide.com/sites/default/files/styles/308x185-scale-crop--more-top-stories/public/control_main_1.jpg)


